The basic user interface elements are explained in this article. This article cum handbook will help you to understand and navigate the tool user interface.

Chapter 1: About this Article

This training article covers the User Interface of Arbortext Editor.


This article will help the end-user to use the Arbortext Editor based on the requirements.

This article does not cover the Arbortext Editor configurations to integrate with Windchill.

Intend of this article is to train the end-user only to use Arbortext Editor from
Desktop Point of View.


Chapter 2: Opening Arbortext Editor

Follow the steps below to open Arbortext Editor from Desktop:

1. Double click Arbortext Editor icon from the desktop.


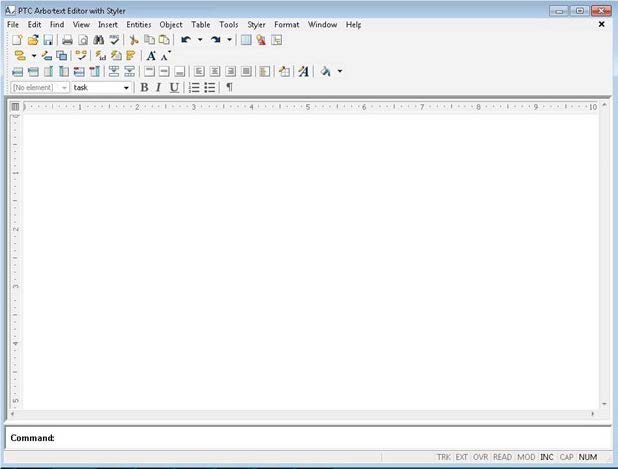
2. Arbortext Editor User Interface Opens.


Chapter 3: Arbortext Editor User Interface Information

This section describes the normal usage of Arbortext Editor UI along with Toolbars and functions


This also defines the settings which should be done before starting working on Editor User Interface.


SECTION 3.1: Editor Full Menu Preference Setting

Make sure that the preference for Full Menu is set before starting any work in Arbortext Editor.


If the preference is not set all the options available in Menu Bar will not visible.

Follow the steps below to set the Full Menu Preference:


1. In Arbortext Editor Go to ToolsPreferences.


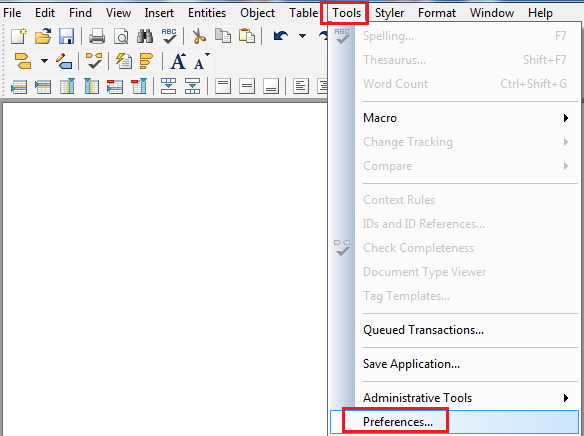
2. As shown below tick the box of “Full Menus” and click on “OK” Button.

_________________________
_________________________


SECTION 3.2: Editor Window Components

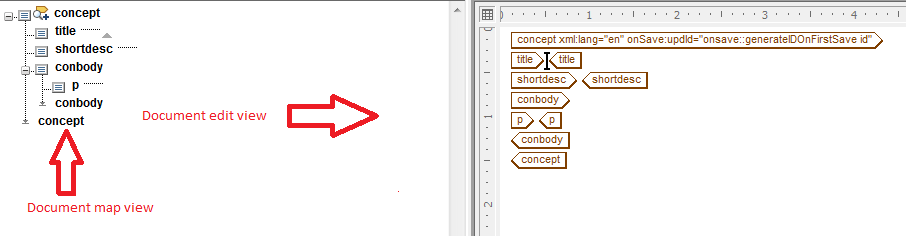
The “PTC Arbortext Editor window” is, by default, divided into two panes, document map view on the left and edit view on the right.


The document map provides an outline view of the document content and the edit view displays the full content of the document. The split bar divides the view. You can change the size of the panes by moving the split bar.


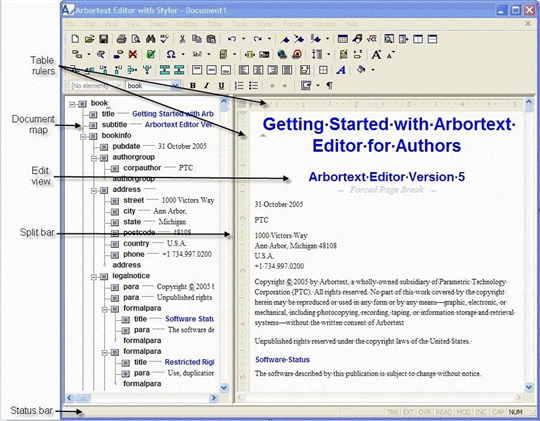
1. “Menus and Toolbars”: The menus and toolbars display a standard set of commands. For detailed descriptions of the menus, toolbars, and their functionality, refer to the online Help topics available from Help ▶ PTC Arbortext

Editor.


2. “Edit View”: The Edit view displays your document with its content and tags. You can change the display of the tags using the View menu. The options enable you to control how much of the tagging structure you want to see as you edit your document.


3. “Document Map”: The Document Map enables you to navigate a graphical outline of the document structure. You can also collapse large sections of the document and move them within the Document Map. The Document Map and the Edit view are fully interactive, so any changes made in one pane are immediately reflected in the other.


4. “Status Bar”: The status bar, located in the lower-left area of the screen, displays tooltips and other messages related to PTC Arbortext Editor's interface and operation.

_________________________

_________________________


SECTION 3.3: Setting Window Views on Pane

Open any XML File from Arbortext Editor. Document Map and Editor View are shown below:


Follow the steps below to set the window pane options:
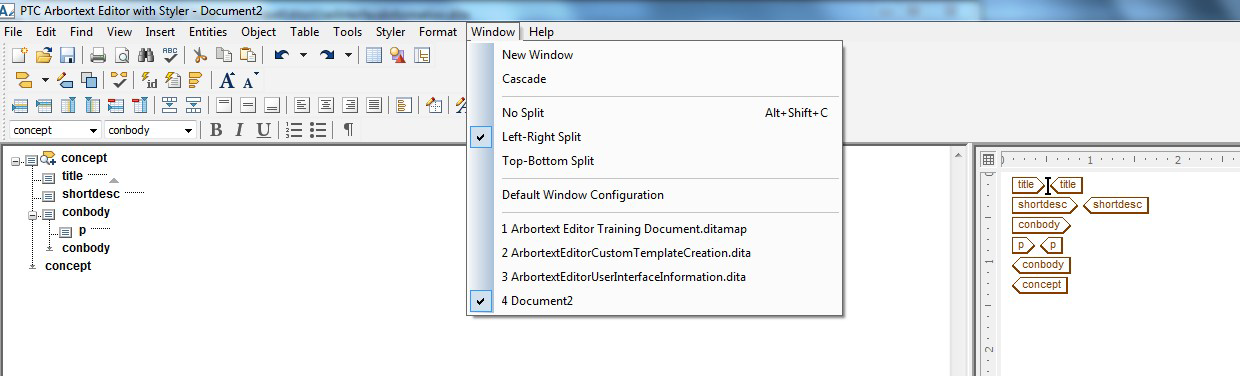

1. As shown below go to WindowNo Split or WindowTop-Bottom Split or WindowLeft-Right Split


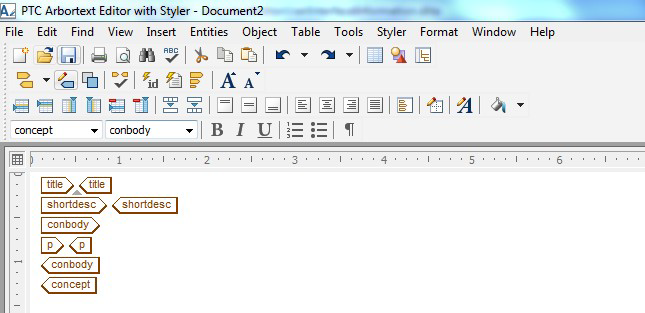
2. If the option Window→No Split is selected. The view will be as shown below:


3. If the option Window→Left-Right Split is selected. The view will be as shown below:


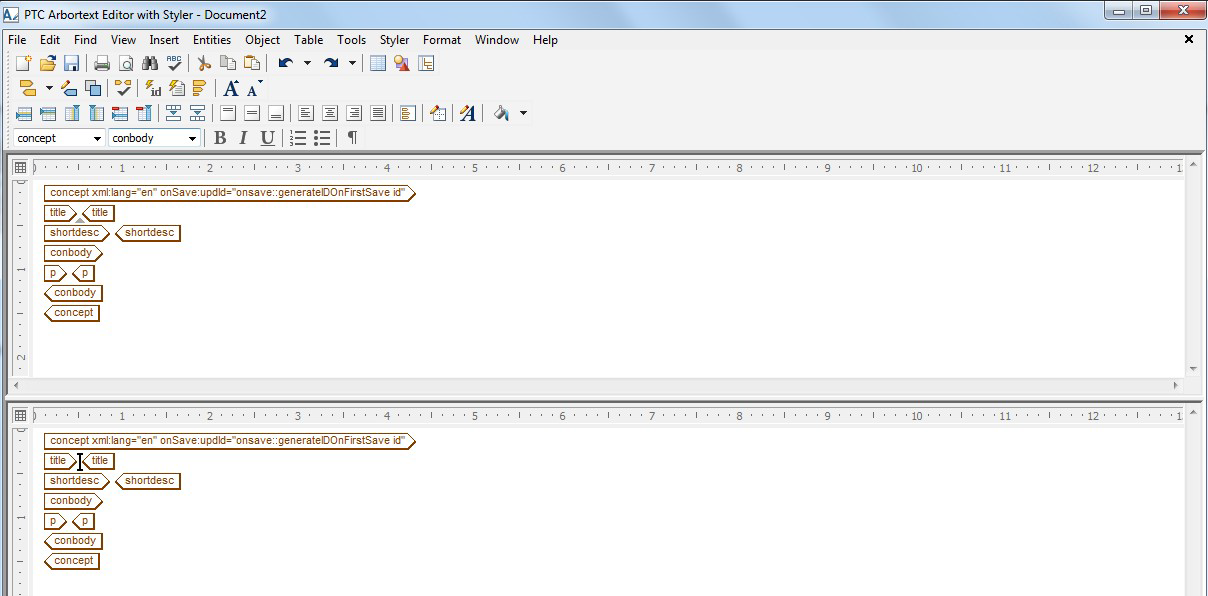
4. If the option Window→Top-Bottom Split is selected. The view will be as shown below:

_________________________
_________________________


SECTION 3.4: Setting Document Map or Edit View

Open any XML File from Arbortext Editor and follow the steps given below:


1. As shown below go to viewDocument Map


2. As shown below view will be set as “document map.”


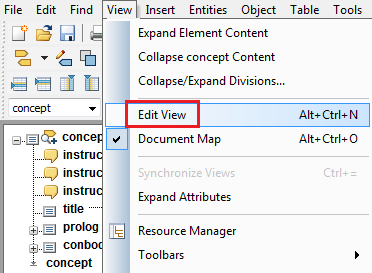
3. As shown below view will be set as “Edit View”.

_________________________
_________________________


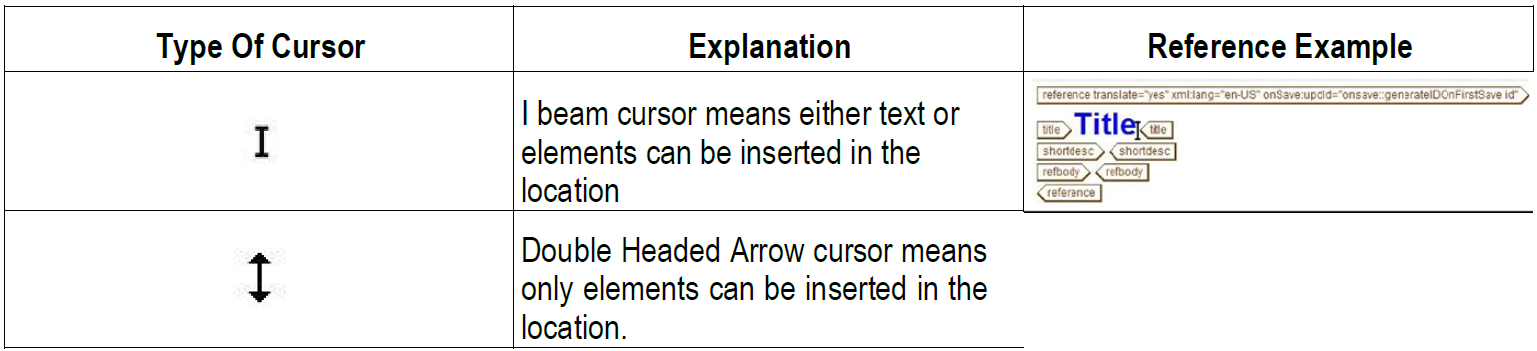
SECTION 3.5: Cursor Options

The “cursor” marks the active location in your document. It is the insertion point where you enter text and insert markup (tags). If more than one windows are open, such as a Preview window and a Help window, it is the active window that receives the action from the keyboard or menus. Within an Edit window pane, you can move the cursor with either the mouse or the arrow keys. Move the cursor between panes of a split window and the PTC Arbortext Editor command line by using the “F6” key.


_________________________
_________________________


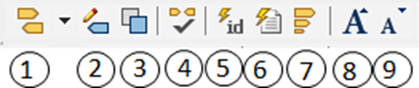
SECTION 3.6: Editor Tool Bar View

This section provides detailed information on toolbar buttons, which serve as different purposes at the time of authoring.


SECTION 3.6.1: Table Tool Bar

The “Table tool bar” gives access to table editing options and functions.


Sl no/ Reference

Function

1

Inserts a new row below the cell containing the cursor.

2

Inserts a new row above the cell containing the cursor.

3

Inserts a new column to the right of the cell containing the cursor. Not applicable to custom table

4

Inserts a new column to the left of the cell containing the cursor. Not applicable to custom tables

5

Deletes the row containing the cursor.

6

Deletes the column containing the cursor. Not applicable to custom tables.

7

Combines two or more selected cells. The contents of the cells are preserved and distributed across the newly spanned cell. Not applicable to custom tables.

8

Splits cells which have been spanned. Any content is placed in the upper left most cell. Not applicable to custom tables.

9

Aligns cell content with the cell's top border. Not applicable to custom tables.

10

Aligns cell content with the center of the cell. Not applicable to custom tables.

11

Aligns cell content with the cell's bottom border. Not applicable to custom tables.

12

Aligns cell content horizontally to the left margin of the cell. Not applicable to custom tables.

13

Aligns cell content horizontally to the center of the cell. Not applicable to custom tables.

14

Aligns cell content horizontally to the right margin of the cell. Not applicable to custom tables.

15

Aligns cell content horizontally along the left and right margins of the cell. Not applicable to custom tables.

16

Cycles through the tag display options for table markup.

17

Opens the Modify Borders dialog box.

18

Changes the font characteristics for text in selected cells.

19

Inserts shading (a background color) at the cursor's location. Clicking the down arrow displays a Shading palette from which you can select a color. Not applicable to custom tables.

Use the option None to output transparent shading - whatever color is behind the cell will be visible.


SECTION 3.6.2: Application Tool Bar

The “Application tool bar” gives access to formatting. Hide or display it by choosing View→Toolbars→Application.


Sl no/ Reference

Function

1

Displays the parent of the tag at the current cursor location, and provides a drop-down list of valid tags to replace it with.

2

Displays the tag at the current cursor location, and provides a drop-down list of valid tags to

replace it with. It is the same as selecting Edit ▶ Change Markup.

3

Bolds selected text or turn off bold.

4

Italicizes selected text or turns off italics.

5

Underlines selected text or removes the underline.

6

Converts the selected tag(s) to a numeric list or reverts from a numeric list. If no tag is

selected, converts the tag containing either selected text or the cursor to a numeric list or reverts from a numeric list.

7

Converts the selected tag(s) to a bulleted list or reverts from a bulleted list. If no tag is selected, convert the tag containing either selected text or the cursor to a bulleted list or reverts from a bulleted list.

8

Inserts a paragraph at the nearest valid location.


SECTION 3.6.3: Markup Toolbar

The “Markup toolbar” gives access to operations that manipulate the document markup. Hide or display the toolbar by

choosing View→Toolbars→Markup


Sl no/ Reference

Function

1

Opens the Insert Markup dialog box, and provides a drop-down list

that enables you to insert valid markup for the current cursor location.

2

Opens the Modify Attributes dialog box.

3

Opens the Apply profile dialog box.

4

Checks completeness by checking that required elements

are present in the document, including any of its file entities.

5

Generates an ID for the active element in a DITA document.


This button is only available when you are editing a DITA topic

or map.

6

Updates the generated text in the current document, including

tables of contents, indices, and cross-references.

7

Cycles through the three types of tag display: Full Tags, Partial

Tags, and No Tags.

8

Increases the size of the font in the pane with the focus.

Font size in percent is shown in the status bar.

The limit is 500 percent of the default size.

9

Decreases the size of the font in the pane with the focus.

Font size in percent is shown in the status bar.

The limit is 40 percent of the default size.

SECTION 3.6.4: Edit Tool Bar

The “Edit tool bar” gives access to editing operations. Hide or display the toolbar by choosing View→Toolbars→Edit.


Sl no/ Reference

Function

1

Opens the New Document dialog box.

2

Opens the Open dialog box. Specifying a file on a server supporting WebDAV opens the file for editing. If you use a URL to specify a file that is not on a WebDAV server, the file will be opened as read-only.

3

Saves the document. If the file was opened from a WebDAV server, it will be saved to that server.

4

Opens the Print dialog box.

5

Opens the Preview dialog box.

6

Opens the Find/Replace dialog box.

7

Opens the Spelling dialog box.

You can set the spelling preferences settings by choosing Tools ▶ Preferences and then choosing the Spelling category.

8

Deletes the selected region and stores it in a paste buffer (clipboard).

9

Makes a copy of the selection and stores it in a paste buffer.

10

Inserts the contents of the paste buffer at the cursor location.

11

Reverses the last change (Undo), and provides a drop-down list that enables you to undo multiple changes at the same time. The list contains the editing changes you have made in a document, starting with the most recent change. You can use the mouse pointer or down arrow key to highlight changes from the top of the list. When you click or press enter, all of the highlighted changes are reversed. You cannot reverse changes in the middle of the list. You must reverse them in the order in which they were performed.

12

Reverses the last undo operation, and provides a drop-down list that enables you to reverse multiple undo operations at the same time. The list contains the undo operations you have performed, starting with the most recent one. You can use the mouse pointer or down arrow key to highlight undo operations from the top of the list. When you click or press enter, all of the highlighted operations are reversed. You cannot reverse undo operations in the middle of the list. You must reverse them in the order in which they were performed.

13

Inserts a table

14

Inserts a graphic

15

Opens and closes the Resource Manager. This button is only available when you are editing a DITA topic or map.


_________________________

_________________________


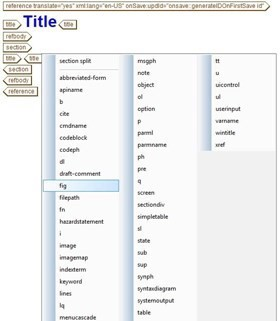
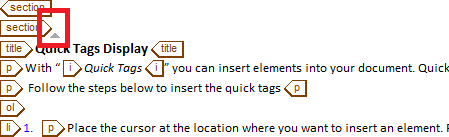
SECTION 3.7: Quick Tags Display

With “Quick Tags” you can insert elements into your document. Quick Tags are a list of elements that appear in a popup at the location of your cursor. 


The length of the Quick Tags popup and the list of elements it contains varies according to where your cursor is in your document when you press “ENTER”.

Follow the steps below to insert the quick tags

1.         Place the cursor at the location where you want to insert an element. Press “ENTER” to access Quick Tags.

2.         Select the Correct Tag.

3.         Press “ENTER” to insert the selected tag.
_________________________
_________________________


SECTION 3.8: Attribute Dialog Box

The attribute dialog box gives access to element definitions. Typically it is used when you start creating content and need to create a new id for the element on the Windchill server or you enter values for a map file cover page.

Follow the steps given below:

1.         Keep your cursor in from the element where you want to access the attribute dialog box. Press “CTRL + D”.

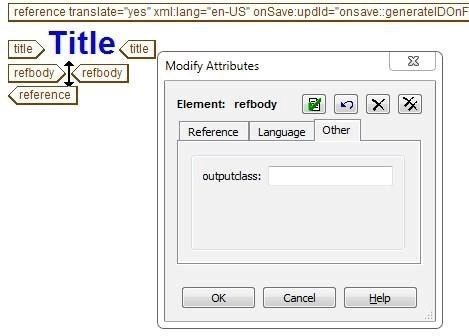
2.         Add value as per the requirement.

_________________________
_________________________

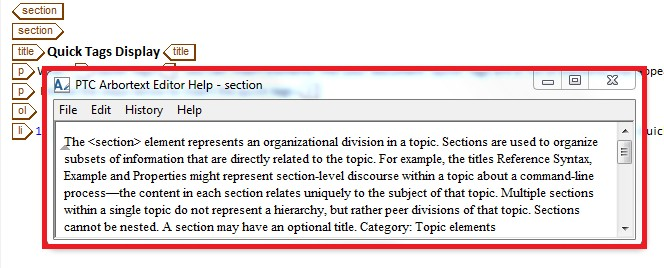
SECTION 3.9: Tags/Elements and their use

When editing in Arbortext, you can see what tags can be inserted to which location by pressing “Enter” at the location where you want a tag inserted. 

Depending on the template you use (topic, concept, task, reference, table, map, and so on) there are different lists of tags available.

The table below lists the example and usage of some of the tag/element.


Tag

Description

conbody

<conbody> contains all authoring elements in the authoring module

p

<p> is a paragraph of text

b

<b> applies bold highlighting on the text

u

<u> underlines text

I

<i> applies italic highlighting on the text

xref

<xref> links to an internal (same file) or external (different file, online page) location


fig

<fig> contains graphics and their titles

image

<image> has option attributes of a graphic

title

<title> is a heading for the document parts of a document such as <topic>, <section>, <sectiondiv> and for the display elements such as figure <fig>, <foldout> and <table>

ol

<ol> is an ordered list of items sorted by sequence or order of importance.


ul

<ul> is an unordered bullet list

li

<li> is a single item in <ol> or <ul>

note

<note> holds notice, caution, danger and warning tables


SECTION 3.9.1: Viewing Tag Help i.e. It’s Description

Follow the Steps Shown below:

1.        Keep the cursor on the Tag for which Description is required

2.         Press “SHIFT+F1” to access the information on the tag.


_________________________
_________________________

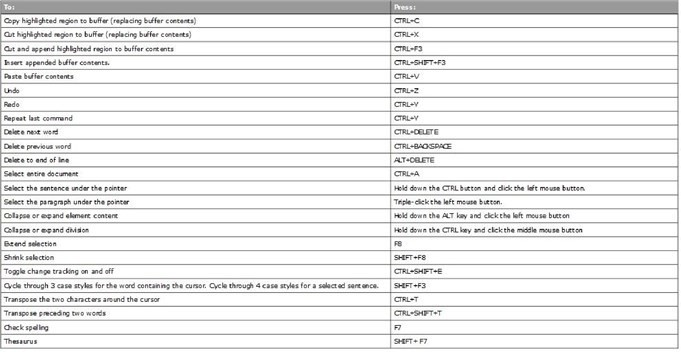
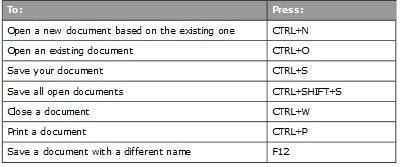
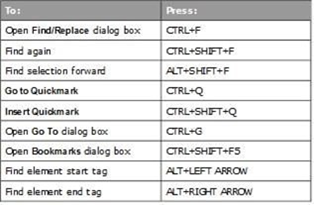
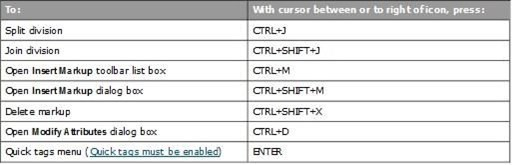
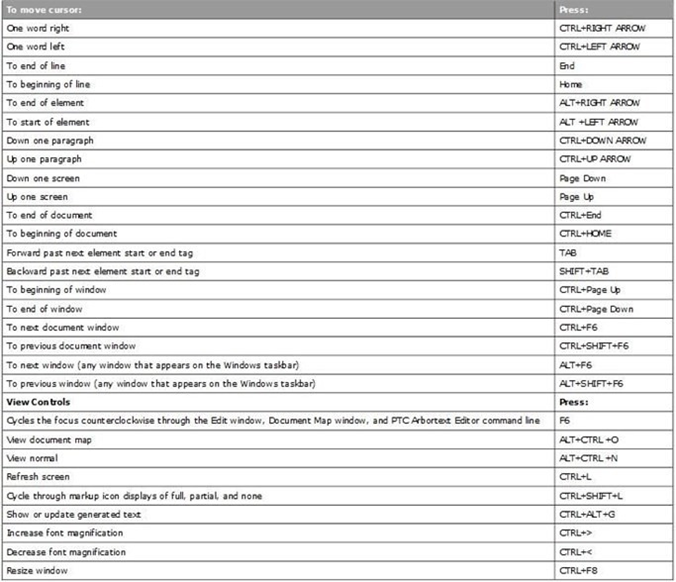
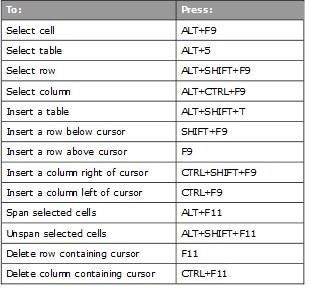
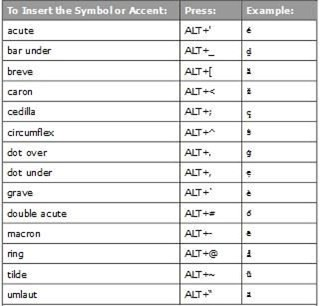
SECTION 3.10: Keyboard Shortcuts

This section provides the option to perform certain functions using Key Board Short Cuts.


SECTION 3.10.1: Editing Functions


SECTION 3.10.2: Opening, Saving and Exiting the Documents


SECTION 3.10.3: Finding Text and Tags


SECTION 3.10.4: Using Mark Up


SECTION 3.10.5: Window Navigation and Control


SECTION 3.10.6: Table Editing


SECTION 3.10.7: Accent Marks and Symbols


0 Comments